 |
Preparing a submission document
(from CRYPTO 2006 webpage)
This web page gives a few instructions and tips
on preparing your submission document in US letter format and using Type 1 fonts instead of Type 3 ones.
On many platforms, it is fairly easy to prepare a document
in a wide variety of formats, and then convert it to either
PDF or PS.
Most authors will be using LaTeX to prepare their submissions.
While this approach is not strictly required, it is strongly recommended;
moreover, papers accepted to the conference must be prepared
using LaTeX (different instructions for preparing final versions
of accepted papers will be sent to authors of accepted papers).
The remainder of this web page deals only with LaTeX
(and in fact, only with LaTeX 2e, the "modern" version of LaTeX),
and is geared towards Unix and Unix-like platforms.
Fonts: Type 1 vs. Type 3
Type 3 fonts
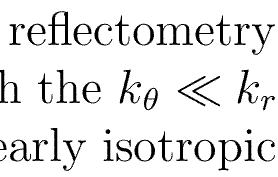
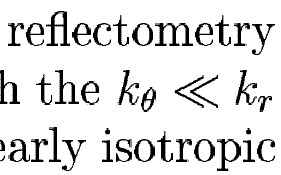
are the culprits behind those ugly, fuzzy looking PDF files
you sometimes see on the web (although they usually print OK).
Type 1 fonts yield PDF files that
display well on screen.
Take a look:

| 
|
| Type 1 fonts
| Type 3 fonts
|
Some PDF viewers deal with Type 3 fonts better than others,
but it is better to simply avoid them in the first place.
Unfortunately, some traditional methods of
producing PDF files using LaTeX often yield PDF files
with Type 3 fonts.
However, most relatively modern distributions of LaTeX
make it easy to produce PDF (and PS) with Type 1 fonts:
sometimes the system defaults may be set up to
do this automatically, and sometimes not.
The instructions below should guarantee
that you get Type 1 fonts, regardless of the default configuration.
Paper Size: Letter vs. A4
A document with an A4 paper size tends to get cropped
when printed on US letter printers, whereas
a document with a US letter paper size does not tend to get cropped
when printed on an A4 printer (although it will not look
particularly beautiful, either).
For this reason, the US letter is the preferred paper size
for submissions.
The instructions below should guarantee
that you get
US letter paper size, regardless of your system's
default configuration.
Preparing the LaTeX File
To get 11 point fonts, reasonable margins, and US letter paper size,
you should make the first two lines of your LaTeX
file look like this:
   \documentclass[11pt]{article}
               \usepackage[letterpaper,hmargin=1in,vmargin=1.25in]{geometry}
You don't need to use any other commands to set the margins.
If you want to adjust the margins on the sides,
change the hmargin amount, and if you want to adjust the
margins on top and bottom,
change the vmargin amount.
Larger margins may make the paper more readable,
and should be used if they don't make your paper exceed the
page limits (setting hmargin=1.5in,vmargin=1.75in would
produce a more pleasant looking paper);
smaller margins are not acceptable.
Generating PDF Files
There are several common approaches to generating PDF files
with LaTeX.
Assume that your LaTeX file is paper.tex.
Method 1: pdflatex
The simplest approach is to use the command pdflatex.
Simply execute the command:
$ pdflatex paper
Now you have a file paper.pdf, and you are done!
If you prepare the LaTeX file as described above,
and follow these steps,
the file paper.pdf
will have 11 point, Type 1 fonts,
reasonable margins,
and US letter paper size.
If you use an integrated TeX development environment,
such as MikTeX, WinEdt, or TexShop,
these are (usually) configured to use pdflatex,
and so if you use these tools, you should be in good shape.
Note:
The use of the geometry package, as described above,
should guarantee that the paper size is set correctly, even if your system
happens to be configured to produce A4 paper size by default.
Method 2: latex + dvipdfm
This pair of commands does the job:
   $ latex paper
               $ dvipdfm -p letter paper
The first command produces the file paper.dvi, and the second
command converts paper.dvi to paper.pdf.
If you prepare the LaTeX file as described above,
and follow these steps,
the file paper.pdf
will have 11 point, Type 1 fonts,
reasonable margins,
and US letter paper size.
Note:
The use of the geometry package by itself
may not
ensure that the paper size is right.
The option "-p letter"
to dvipdfm will do the job.
Method 3: latex + dvips + ps2pdf
This sequence of commands does the job:
   $ latex paper
               $ dvips -t letterSize -Ppdf -G0 paper
               $ ps2pdf -sPAPERSIZE=letter paper.ps
The first command produces the file
paper.dvi, the second converts paper.dvi to paper.ps,
and the third converts paper.ps to
paper.pdf.
If you prepare the LaTeX file as described above,
and follow these steps,
the file paper.pdf
will have 11 point, Type 1 fonts,
reasonable margins,
and US letter paper size.
Notes:
Checking your PDF files
If you open your PDF file with Acrobat Reader,
the text should not appear fuzzy;
you should see the paper size in the lower left hand corner:
it should be 8.5 x 11 in (or 215.9 x 279.4 mm, or 612 x 792 pts).
If you look under File -> Document Properties -> Fonts,
you should see all the fonts that are used in the document,
and their type. You should see lines of the form "Type 1" (or "Type 1C"),
and not "Type 3".
You can also get information about your PDF file from the
command line (assuming the appropriate commands are installed):
$ pdfinfo paper.pdf
prints general information, including paper size, and
$ pdffonts paper.pdf
prints detailed font information.
Generating PS Files
If you only want to generate a PS file,
and not (necessarily) a PDF file, just follow the instructions
above in "Method 3: latex + dvips + ps2pdf",
but do not execute the ps2pdf command.
If you open your PS file using gv,
the paper size information should be clearly displayed.
Font information is not so readily available.
Advanced Topics and Trouble Shooting
-
How do I include graphics?
This is a rather complicated and messy issue.
However,
here is a crash course
that shows you a few simple, yet powerful,
techniques for including graphics (such as
those produced by xfig) in your document.
These techniques should work as described on most systems,
but may require a bit of fiddling on others.
First, insert the following line in the preamble of your LaTeX
file:
\usepackage{graphicx,epsfig,color}
If you use pdflatex (Method 1):
-
You can insert a PDF file foo.pdf
containing a graphic by placing the following command in your LaTeX
file
wherever you want the graphic to appear:
\includegraphics{foo}
Note that this command
will look for the file foo.pdf when running pdflatex.
You can conveniently scale and rotate your graphic
using this command as well; e.g.,
\includegraphics[scale=0.5,angle=45]{foo}
scales the image by a factor of 0.5, and rotates it counter-clockwise
45 degrees.
-
You can insert an Encapsulated PostScript (EPS) file foo.eps
in your document by first converting it to PDF:
$ epstopdf foo.eps > foo.pdf
and then proceeding as above.
-
If you are using xfig to generate your graphics,
and you want to have the text in your figure interpreted
by LaTeX (e.g., an equation), here is one simple way to do this.
In xfig, set the font of your text boxes to "latex fonts"
and set "special" flag to true.
To do this within xfig, select the text tool,
and look for the appropriate menus;
this can also be done automatically by adding the following lines
to your .Xdefaults (or .Xresources) file:
   Fig.latexfonts: true
               Fig.specialtext: true
When you do this, run
$ xrdb -load ~/.Xdefaults
to make this take affect the next time you start xfig.
Now, when you are ready, export your figure, selecting
the "Combined PDF/LaTeX" format.
If you choose the file name foo.pdf,
then xfig creates two files: foo.pdf
and foo.pdf_t.
In your LaTeX file, simply include the command
\input foo.pdf_t
wherever you want your graphic to appear.
Notes:
-
If your xfig file is foo.fig,
do not use the default output file name of foo.pdftex,
as pdflatex will not be happy with this;
rather, explicitly choose foo.pdf as the output file name.
This is apparently a bug in either xfig or pdflatex.
-
Sometimes xfig creates PDF files that
are oriented incorrectly (rotated 90 degrees).
This is also apparently a bug, and can be corrected by
switching xfig's "view" from portrait to landscape
(or vice versa) before exporting to PDF.
If you use latex (Methods 2 or 3):
-
You can insert an EPS file
foo.eps in your
document placing the following command in your LaTeX file
wherever you want the graphic to appear:
\includegraphics{foo}
Note that this command
will look for the file foo.eps when running latex.
-
If you are using xfig to generate your graphics,
and you want to have the text in your figure interpreted
by LaTeX, this is easily accomplished
in the same as above (in the pdflatex case),
except that when exporting, choose the
"Combined PS/LaTeX" format.
If you choose the file name foo.eps,
then xfig creates two files: foo.eps
and foo.eps_t.
In your LaTeX file, simply include the command
\input foo.eps_t
wherever you want your graphic to appear.
If you are on MAC OSX,
a great alternative to xfig
is to use the OmniGraffle application (bundled with
v10.3 of OSX), combined with
a tool such as LaTeX Equation Editor or TexShop
(available for free on the web).
You can compose your diagram in OmniGraffle,
and drag and drop PDFs from LaTeX Equation Editor
or TexShop right into
OmniGraffle.
Then simply export from OmniGraffle,
either as EPS or PDF,
and import this into your LaTeX as above, using \includegrahpics.
If you use LaTeX Equation Editor and export from OmniGraffle
directly to PDF,
due to some GhostScript/Apple/Adobe compatability bug,
you might want to use GhostScript version 6, rather than version 8;
otherwise, you may get PDF files that do not print correctly from
Adobe Acrobat.
Fink users: sudo apt-get install ghostscript6.
Alternatively, export from OmniGraffle to EPS, or
use TexShop (which uses pdflatex, rather than GhostScript).
-
Why does my PDF file still look fuzzy?.
This should not happen if you follow the steps
outlined above and you have a fairly modern
and complete LaTeX installation, and a fairly modern GhostScript
implementation (if using Method 3 for generating PDF).
As already mentioned above, if you use Method 3 for generating PDF,
the problem will arise if you have a GhostScript version older than version 6.
The solution: upgrade GhostScript, or use Methods 1 or 2, rather than Method 3.
The problem may arise if you use Computer Modern
fonts (this is the LaTeX default), and your installation
of LaTeX does not have Type 1 versions of these fonts installed.
Short of upgrading to a newer version of LaTeX
(or borrowing one from a friend),
one work-around is to try using Times Roman font;
however, the trick is to get your math typeset in Times Roman as well.
Try adding on of the following lines to your LaTeX file:
   \usepackage{txfonts}
               \usepackage{times,mathptm}
               \usepackage{times,mathtimes}
Note that if you have this problem your PS files will
also have Type 3 fonts (if you convert your PS to PDF via
ps2pdf, you will see the fuzz).
-
What if I want A4 paper size?
Although A4 paper size is not acceptable
for CRYPTO 2005 submissions,
just for completeness (and fairness),
here are the changes to the above instructions necessary
to force A4 paper size.
-
In preparing the LaTeX file, replace the "letterpaper"
option to the geometry package by
"a4paper".
- pdflatex: no changes.
- dvipdfm: replace the "-p letter"
option by "-p a4".
- dvips: replace the "-t letterSize"
option by "-t A4size".
Note "-t A4size" is preferred to "-t a4"
for the same reason that "-t letterSize" is
preferred to "-t letter".
-
ps2pdf: replace the "-sPAPERSIZE=letter" option by
"-sPAPERSIZE=a4".
Caveat Emptor
These tips and tricks are based on
experience and experimentation on particular systems,
as well as on information culled from the web.
Your mileage may vary (depending on your operating system,
your LaTeX installation, etc.).
|
 |


